
In this post we will explore managing local users on ESXi host through CLI, GUI and also discuss role management in local ESXi host. The process is identical in ESXi 6.x as well as ESXi 7.x version. For all versions of ESXi, you can see the list of predefined users in the /etc/passwd file.
Usually, you should manage privileges for users by assigning permissions to an ESXi object in vCenter Server inventory foe general use cases. However, best practice is also to create at least one local user account in ESXI host, assign it full administrative privileges on the host, and use this account instead of the root account.
In case you are using a standalone ESXi host in your environment then you will need to create and manage users directly on ESXi hosts anyway.
Creating a local user account in ESXi host is fairly simple process. You can use ESXi host Command line or GUI, i.e., Host client (HTML) to manage local users as it has to be done on ESXi host directly.
First of all we will see how to create local users using ESXi host local shell.
Note: If you define a local user on ESXi host directly and a user with the same name also exists in vCenter Server, these users are different not same.
Add user using ESXi Shell:
Switch to ESXi local shell or ssh to ESXi host.
- esxcli system account list
-
- This will list existing accounts in ESXi host.

- Run below command to add the local user account with required user details
- esxcli system account add –id Demo-CLI –password –password-confirmation
- This will add a user called as testuser1 with password mentioned. Ensure that Password entered is as per ESXi Password policy. Check ESXi 7 password policy.
![]()
- You can also use below format instead of above

- esxcli system account list
- To verify that user is added to local system

Add users using ESXi host client:
- Connect to your ESXi with Host client at https://<ESXi Name>/ui and navigate to Manage

- Navigate to Security and Users, Click Users on right side and click Add User as in image below.
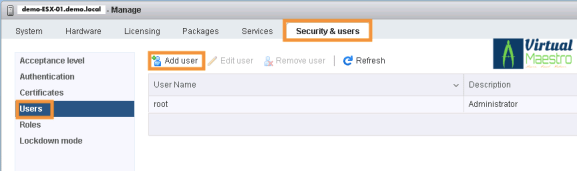
- On Add a User screen, Enter User details and click Add.

- As you can see in below image, both users that I added in above steps, GUI as well as CLI, are visible in the list.

- Although I added users in above steps, none of them are associated with any role as now.
- While creating users, there is no option to associate user with a role group as you can see in above screenshot while adding a user.
- On ESXi Shell as well there is no option in ESXCLI cmdlet with add user namespace.

- However, we can use ESXCLI to set the permissions using permissions namespace.

- I will use GUI for managing roles and permissions for local users in next section.
Roles Management:
Below are the default list of system roles that are present in ESXi host. Note that System roles are permanent. You cannot edit the privileges associated with these roles. As you can see, I have selected Administrator role but Edit button is greyed out.

The predefined roles in ESXi host.
- Read Only
- Allows a user to view objects associated with the ESXi host but not to make any changes to objects.
- Administrator
- Administrator role.
- No Access
- No access. This role is the default role. You can override the default role.
- No Cryptography Administrator Role
- Users with this role have the same privileges as users with the Administrator role, except for Cryptographic operations privileges.
Also note that, you can use system roles to assign to users when required with exceptions such as Anonymous role. As in image below Anonymous role, View role are not available to assignment.

- You can click on Add role to create a custom role. I will create one for demo purpose and assign it to one of the custom user created.

- Once clicked Add Role, assign Role Name and select required privileges from the list and click Add as in image below.

- That should populate the custom role that I just created.

Assigning Role to User:
Assigning role to user is not done from Security and Users screen. Role assignment is done through permissions page under Action menu as in screenshot below.

- Once on Manage permissions page, click add user to add the user. This is required as the local user we created are not in the list by default as they were not associated with any role while creating them.

- Select the user account that needs to be assigned with role.

- Select the role from the dropdown menu. I will assign the custom role that I created. Once selected, click Add user.

- I added my other user with Read only system role as well.

Removing local user
To remove the local user, you can use the GUI as in screenshot below.

Also, you can remove local users through command line as well.

Wrapping up:
- Configure ESXi to use a directory service such as Active Directory to manage users.
- For auditing purpose, create individual accounts for administrators with Administrator privileges, do not share root account among administrators.
- Use complex password for the root account and limit the use of the root account
- Do not remove the root account.
- You can remove the access privileges for the root user. But first create a different user assigned with Administrator role.
- Do not change vpxuser in any way. Do not change its password. Do not change its permissions. You may experience problems while working with hosts through vCenter Server if changed permissions.
- The dcui user runs on hosts and acts with Administrator rights. This user acts as an agent for the direct console and cannot be modified or used by interactive users.
That is all for this post.
!!!Cheers!!!